Televisi LED COB All-in-One
  Tampilan LED Fleksibel
  Tampilan LED Transparan
  Poster yang Dipimpin
  Layar LED Melingkar
  Layar LED Kreatif & Kustom
 Most LED poster problems have a 5-minute fix — but only if you know where to start. This guide covers daily cleaning procedures by encapsulation type, module replacement, the signal chain troubleshooting sequence, firmware updates, and what to keep in your spare-parts kit so a dead pixel never means a dead event.

- 80% of “broken poster” service calls have the same three root causes: loose signal cable, incorrect NovaLCT configuration, or a power supply that tripped its internal protection. Check these before calling support. The fix usually takes less time than the phone call.
- Cleaning is encapsulation-dependent. COB and GOB posters can be cleaned with a damp microfiber cloth and mild glass cleaner — the sealed surface handles it. SMD posters need a dry microfiber cloth or a very light mist on the cloth only — never spray directly on the surface, and never use ammonia-based cleaners, which can corrode exposed LED leads.
- Module replacement is a 7-minute job that requires one magnetic screwdriver and zero electrical knowledge. Four corner screws, one ribbon cable, swap, reverse. The module is plug-and-play — no calibration, no configuration, no firmware reload. Carry one spare module per 10 posters.
- A spare-parts kit that costs $200 prevents a service call that costs $500. The kit: one LED module, one power supply unit (Mean Well LRS-350-5), two CAT6 cables, one 30mm magnetic screwdriver, one microfiber cloth, one USB with NovaLCT and .rcfg files, and one tube of thermal paste.
Daily Cleaning — What to Use and What to Never Touch
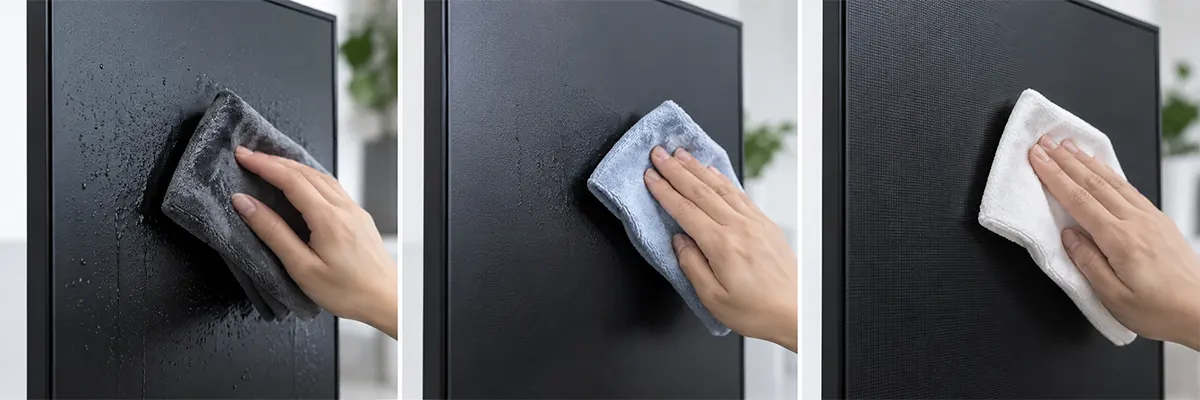
LED posters accumulate dust, fingerprints, and in retail environments, a fine film of airborne grease from nearby food courts or street-facing entrances. Cleaning is simple, but using the wrong cleaner on the wrong encapsulation destroys LEDs. Here’s the safe cleaning protocol by encapsulation type.
| Enkapsulasi | Metode Aman | Jangan Pernah Gunakan |
|---|---|---|
| COB (IP54) | Damp microfiber with water or mild glass cleaner. Wipe in one direction. Can be cleaned while powered on. | Abrasive pads, ammonia-based window cleaners, isopropyl alcohol >70%, direct spray on surface |
| PELAYAR | Damp microfiber — spray water on cloth, not on poster. Wipe gently. Avoid excessive moisture at module edges where epoxy meets frame. | Chemical glass cleaners (can cloud epoxy over time). Scouring pads. Pressure washers. |
| SMD (unsealed) | Dry microfiber cloth only. For stubborn marks, lightly dampen a corner of the cloth — not the poster — with distilled water. Poster must be powered off and cool. | Any liquid sprayed on surface. Any chemical cleaner. Ammonia. Alcohol. Compressed air at close range (forces dust under LEDs). |
Frekuensi Pembersihan
- Retail (1–2m viewing distance): every 2–3 days. Customers see dust and fingerprints at close range. COB posters attract less dust because the smooth epoxy surface has no gaps for electrostatic accumulation.
- Corporate lobby / meeting room: weekly. Controlled environment with lower traffic.
- Exhibition / trade show: every morning before doors open. Overnight dust from hall HVAC systems settles on all vertical surfaces.
- Rental fleet: clean upon return to warehouse. Inspect for dead pixels at the same time — catching a dead module while the poster is in the warehouse means it’s fixed before the next booking, not discovered during the next setup.
Use a clean microfiber cloth. A cloth that picked up grit from the floor will scratch any surface. Keep one cloth per poster or one per cleaning session. Wash microfibers separately from other laundry — fabric softener coats the fibers and reduces their dust-lifting ability. Do not use paper towels, terry cloth, or old T-shirts — all three leave fibers or micro-scratches.
Module Replacement — The Only Repair You’ll Actually Do Yourself

LED poster modules are designed to be field-replaceable. Each module is approximately 320×160mm and contains a matrix of LEDs, a driver IC, and a connector for power and data. When a module has dead pixels, color shift, or a dead row, the fix is replacement — not attempting to repair individual LEDs (which is possible on SMD but impractical on-site).
Step-by-Step Module Swap
Alat yang dibutuhkan: one magnetic Phillips-head screwdriver (PH2), one replacement module of the identical model and pixel pitch. Total time: 7 minutes for a single module, 3 minutes once you’ve done ten of them.
- Power off the poster. Module connectors are hot-pluggable on paper, but not in practice — a loose connection during power-on can short the driver IC. Switch off at the power supply, not just via software.
- Locate the failed module. Identify by module position (row and column, counting from top-left). If the poster is running a full-white test pattern (available in NovaLCT under Screen Control → Test Pattern), dead pixels are immediately obvious.
- Remove four corner screws. The screws are M3 countersunk — they sit flush with the module surface. The magnetic tip catches them so they don’t fall behind the frame.
- Disconnect the ribbon cable. A 16-pin or 20-pin flat ribbon cable connects the module to the receiving card. Grip the connector housing — not the ribbon itself — and pull straight out. The connector has a friction lock; don’t wiggle side to side.
- Connect the new module. Align the ribbon cable connector with the socket on the replacement module. Push straight in until it clicks or seats firmly. The connector is keyed — it only fits one way.
- Screw the module in. Tighten four screws evenly — not tight enough to warp the module PCB. Module screws torque to approximately 1.5Nm (firm finger-tight plus a quarter turn).
- Power on and verify. The poster will display whatever content was last loaded. Run a test pattern if you want to confirm all pixels active. The Novastar receiving card automatically detects the new module — no configuration needed.
LED modules from different production batches can have slightly different brightness calibration data. If the module serial number’s first four digits (the batch code) don’t match the poster’s original modules, the replacement module may appear slightly brighter or dimmer than its neighbors. This is corrected by reloading the calibration file (.clb) in NovaLCT — it takes 30 seconds. For critical deployments where visual uniformity matters (luxury retail, broadcast), order replacement modules from the same batch as the poster — provide the original order number and we’ll match it from inventory.
The Troubleshooting Flowchart — 80% of Problems Are Solved Here
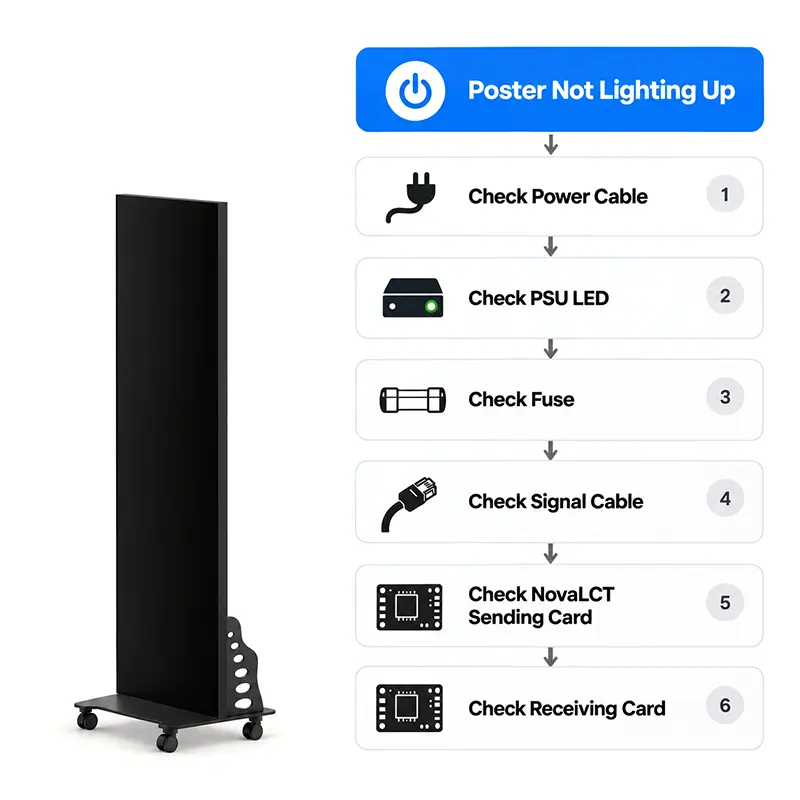
When a poster doesn’t work, the instinct is to call the manufacturer. Run through these checks first — you’ll fix more than three-quarters of problems yourself and save a support ticket for something hardware-level that actually needs an RMA.
Symptom: Poster Is Completely Black (No Power)
- Check the power cable. Is the IEC C13 connector fully seated at the poster’s rear panel? Is the other end plugged into a working outlet? Test the outlet with a phone charger.
- Check the power supply LED. Open the rear service panel. The Mean Well LRS-350-5 power supply has a green LED indicator. If it’s off: no input power, or the PSU’s internal fuse tripped. If it’s blinking: the PSU is in protection mode — unplug, wait 30 seconds, replug. Blinking LED = output short circuit, often from a loose module power connector.
- Periksa sekring internal. Near the IEC C13 inlet on the power distribution board, there’s a 10A glass fuse in a clip holder. Visually inspect — if the wire inside is broken, replace with identical 10A 250V fuse. Cost: $0.50. Cause: usually a power surge during thunderstorm or generator startup.
Symptom: Poster Is On But Shows Nothing / Black Screen With Power LED
- Check the signal cable. The CAT5/6 cable from the sending card (at the PC) to the poster must be connected. If the poster is far from the PC, check every inline RJ45 coupler in the signal path.
- Check NovaLCT sending card detection. Open NovaLCT → Screen Control → Sending Card. If “No sending card detected,” the USB cable from PC to sending card is disconnected or the sending card driver needs reinstallation.
- Check receiving card status. In NovaLCT, go to Screen Control → Receiving Card. The receiving card in the poster should appear with a green status indicator. Red = no signal from sending card. Gray = card not detected — reseat the ribbon cable between sending and receiving cards.
Symptom: Part of the Screen Is Scrambled / Wrong Colors / Dead Rows
- Reseat module ribbon cables. Power off. Open the rear service panel. Find the ribbon cable connecting the receiving card to the affected module. Disconnect and reconnect it — a partially seated ribbon cable is the single most common cause of scrambled content.
- Check for a failed module. If reseating cables doesn’t fix it, the module itself has failed. Swap it with the module next to it. If the problem moves with the module → replace the module. If the problem stays in the same position → the receiving card output port is faulty → RMA the receiving card.
- Reload the .rcfg file. In NovaLCT, go to Screen Control → Receiving Card → Load Configuration File. Select the .rcfg file from the USB that shipped with the poster. Wrong module arrangement data produces exactly scrambled-content symptoms.
Symptom: Single Dead Pixel / Stuck Pixel / Flickering Module
- Dead pixel (always off): the LED chip has failed. On COB, replace the module. On SMD, an individual LED rework is possible but impractical on-site — replace the module for speed. On GOB, same as COB — the epoxy layer prevents individual rework; replace the module.
- Stuck pixel (always on, usually bright): the LED driver IC on that module has a stuck output channel. Sometimes resolves with a power cycle. If persistent after cycling power → replace the module.
- Flickering module: loose power connector or dying power supply. First, reseat the module’s power connector. If flickering continues, swap the power supply’s DC output cable to a different connector on the distribution board. If the flicker follows the cable → power supply issue. If it stays on the same module → replace the module.
A clear photo of the affected area (taken with the poster displaying a full-white test pattern) lets our engineer identify the issue remotely. Include a photo of the receiving card’s status LEDs if the unit won’t power on.
Power Supply Issues — The Component Most Likely to Fail After 3 Years
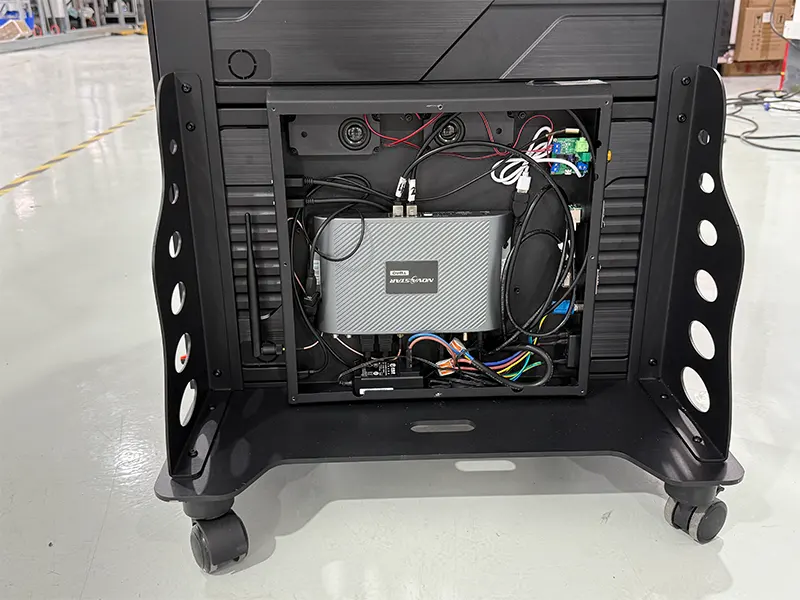
LED posters use industrial-grade power supplies — typically Mean Well LRS-350-5 (350W, 5V output) in single-PSU models, or dual PSUs in larger posters. These PSUs are rated for 30,000+ hours at full load and 40°C ambient temperature. In a climate-controlled retail environment at 22°C and 60% load, they last 5–7 years. In a non-air-conditioned exhibition hall at 35°C and near-full load, expect 3–4 years.
Signs of a Failing Power Supply
- Poster randomly reboots during operation — the PSU’s over-temperature protection is cycling.
- Brightness flickers, especially when the content contains large white areas — the PSU can’t sustain the current draw at high brightness.
- One section of the poster (usually half, corresponding to one PSU in a dual-PSU model) is dimmer than the other half — one PSU’s output voltage has drifted low.
- Audible buzzing from the PSU — failing capacitors. Replace immediately; capacitor failure can cascade into the LED modules downstream.
PSU Replacement — 10 Minutes
The Mean Well LRS-350-5 is a standard industrial PSU available from electronics distributors worldwide (DigiKey, Mouser, RS Components, etc.). It’s not a proprietary part — any LRS-350-5 with the same specifications works. Replacement steps:
- Power off and unplug the poster. Wait 2 minutes for capacitors to discharge.
- Open the rear service panel. Photograph the wiring connections to the old PSU — AC input (brown/blue/green-yellow) and DC output (red/black screw terminals).
- Unscrew the four mounting screws holding the PSU to the frame.
- Disconnect AC input and DC output wires — note which terminal each wire connects to. The screw terminals are labeled L / N / ⏚ for AC and +V / -V for DC.
- Mount the new PSU, reconnect wires in the same positions. Torque terminal screws: 0.8Nm — firm but don’t strip the brass threads.
- Power on and verify the green LED on the PSU. Check that the poster displays content correctly.
A note on dual-PSU posters: if the poster uses two PSUs, they’re wired independently — each powers half the poster. Don’t cross-connect the DC outputs; the PSUs are not designed for parallel operation and will fight each other, both entering protection mode. Replace the failed PSU with the same model and leave the working one untouched.
Firmware and Software Updates — When to Update and When to Leave It Alone
Novastar releases firmware updates for receiving cards and sending cards roughly twice per year. These updates fix edge-case bugs, add support for new features, and occasionally improve color processing algorithms. The rule of thumb: update if you’re experiencing a documented bug. Do not update a working system just because an update exists.
What to Update
| Komponen | Perbarui Frekuensi | Tingkat Resiko |
|---|---|---|
| NovaLCT (PC software) | Update freely — always safe | Rendah |
| Sending card firmware | Update if documented bug applies | Medium |
| Receiving card firmware | Update only if Novastar or manufacturer instructs | Menengah-tinggi |
Receiving card firmware is the most sensitive update. If the firmware flash is interrupted — PC crashes, USB cable disconnects, power loss — the receiving card bricks. Recovery requires a hardware programmer connected to the card’s debug header, which means returning the card to the factory. Only update receiving card firmware when specifically instructed by DOIT VISION support or Novastar documentation, and only with the poster connected to a UPS.
Back Up Your Configuration
In NovaLCT, go to Screen Control → Receiving Card → Save Configuration to File. Save the .rcfg file to a cloud-synced folder (Google Drive, Dropbox, OneDrive) and to the USB drive kept in the flight case. This is your poster’s configuration DNA — if the receiving card is ever replaced or reset, this file restores the exact module arrangement, brightness calibration, and color temperature settings.
The Spare-Parts Kit — What to Keep On Hand
For any deployment where the poster generates revenue — rental fleet, event production, or any installation where downtime has a measurable cost — keep a spare-parts kit. The total cost is approximately $200. The first time it prevents a canceled event or a missed client deadline, it pays for itself 5–10 times over.
| Barang | Qty | Kira-kira Biaya | Tujuan |
|---|---|---|---|
| Spare LED module (matched to poster pixel pitch) | 1 per 10 posters | $ $ 40 80- | Dead-pixel / flickering module swap |
| Mean Well LRS-350-5 PSU | 1 per 20 posters | $ $ 35 50- | Penggantian catu daya yang gagal |
| Shielded CAT6 patch cable (2m / 5m) | 2 of each length | $8–$15 masing-masing | Failed or damaged signal cables |
| IEC C13 power cable (2m) | 2 | $5–$10 masing-masing | Damaged or lost power cables |
| 10A 250V glass fuse (5×20mm) | 3 | $ 0.50 setiap | Internal fuse replacement after power surge |
| Magnetic Phillips screwdriver (PH2 × 30mm) | 1 | $ $ 8 15- | Module and PSU screw removal |
| Microfiber cloth (clean, sealed in bag) | 3 | Jumlah total $5–$8 | Pembersihan permukaan |
| USB drive with NovaLCT installer + .rcfg + .clb files | 1 | $ $ 5 10- | Configuration restore after card swap |
Store the kit in a labeled Pelican case or similar hard-shell container. Inventory it after every event where a part was used and reorder immediately — the kit is useless if the spare module was consumed at last month’s trade show and nobody replaced it.
End-of-Life and Recycling — What Happens After 50,000 Hours
LED posters have a service life far longer than consumer electronics — 50,000 hours to half-brightness (approximately 17 years at 8 hours per day, or 6 years of 24/7 operation). Most posters are retired not because the LEDs fail, but because the pixel pitch becomes obsolete relative to newer technology, or because the physical form factor no longer fits a renovated space.
When to Retire vs. When to Repair
If the poster has been in service for 5+ years and needs more than two module replacements simultaneously, run the math: (cost of replacement modules + technician time + shipping) vs. (cost of a new poster with current technology). Often, the new poster wins — pixel pitch has improved, brightness has increased, and the contrast ratio on modern COB modules makes the 5-year-old SMD poster look visibly dated.
Daur ulang
LED posters contain materials that should not go to landfill: aluminum (the frame is 100% recyclable), steel (mounting hardware), copper (PCB traces, wiring), glass (LED chip substrates), and epoxy resin (encapsulation — not recyclable but inert when cured). Most countries have e-waste recycling centers that accept LED displays. The aluminum frame alone is approximately 60% of the poster’s weight — that’s a valuable scrap metal stream if processed correctly.
DOIT VISION accepts returned posters for component recovery — contact [email dilindungi] with the model, serial number, and your location. We’ll arrange logistics for posters being retired from commercial service.
Tell us the poster model and serial number — we’ll confirm part compatibility, check inventory, and ship same-day if ordered before 14:00 Shenzhen time (UTC+8).